Tags, Extras, Freebie Cluster Frames, Banners, Stamps, Blinkies, Glitter tags etc
Date, Time
My Fairies


Followers
Thursday 21 June 2012
15:18 | Edit Post

Tutorial written on 21th June 2012
This tutorial assumes you have working knowledge of Adobe Photoshop CS2
This tutorial assumes you have working knowledge of Adobe Photoshop CS2
♥ Supplies Needed ♥
♥ Tube of Choice I used PTU Lady Berry by Misticheskaya can be Purchased at SATC
♥ Scrap Kit of Choice I Used PTU Strawberry Passion by
Bibi's Collection can be Purchased at SATC
♥ You Need SATC License number to use this Art
♥ Font of Choice I used LainiedaySH
♥ Template of choice i used EL#102
♥ Scrap Kit of Choice I Used PTU Strawberry Passion by
Bibi's Collection can be Purchased at SATC
♥ You Need SATC License number to use this Art
♥ Font of Choice I used LainiedaySH
♥ Template of choice i used EL#102
Mask of choice
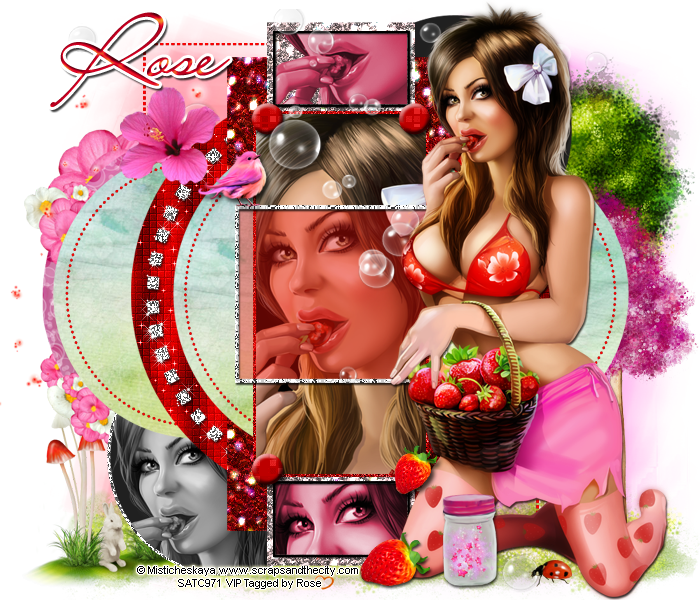
Open new image (ctrl+n) size 700 x 600 pxl with white bg color
Open Template and copy all layers and paste to your image resize it 80x80
Open tube and paste tube layer on the right side of template resize 70x70
open 2nd tube layer1 (face) paste it on the black rectangle layer of template cut the tube part sticking out of the black rectangle, copy tube and paste it on upper and lower part of the white rectangle inside the black frame, and one copy of tube in grey circle3 Cut the tube part sticking out of the frames and circle
Select the tube on the white rectangle select both layers and change color
Click Image> adjustment> hue/saturation (Ctrl+U > colorize> hue 351 saturation 50
select tube layer on grey circle3 Click image> adjustment> Desaturate
Open paper one from scrap kit and paste it on Grey Circle1, purple circle1 and 2
change the color of all dotted frames in red
Now select pink square and change color #ec0f07 Opacity 40%
now apply patterns of your choice I love Glitters so i used some glitter patterns
white rectangle i used silver glitter pattern,
for frames i used silver Glitter pattern
for purple rectangle and black circle red pattern of your choice, i used red glitter patterns
Open Element 10 make resize it 40 x 40 make 2 more duplicate layers
place all three layers at lower part of the image behind all the layers
place element 30 on left side of the image at the lower part oft he template
resize it 50x 50 transform flip horizontal
Place element 6 (resize 80x80) element 36 (resize ) and
element 40(60x60) on the left side on the template as shown in the image
place element 2 behind the tube layer at center of the image
Open element 25 duplicate it place one one the lower part of the tube (resize40x40)
place duplicate 25 at right lower corner of black rectangle, resize 30 x 30 rotate -39
Open element 27(resize 40x40) and 35 (resize 40x40) place them lower part of the tube
Open Element 29 resize (60x60) and 37(resize 50x50) place them behind template
on the right side of the image , now add mask of your choice color #f384ab
♥ Add copyright info and license number correctly
Add text, font of your choice add effects stroke (color white) , drop shadow,
add color overlay color Red,
Now delete your white bg layer and save as PNG
I hope you enjoyed this Tutorial 

Subscribe to:
Post Comments
(Atom)
Search
Categories
- Extras (136)
- Bibi's Collection (78)
- Tags (75)
- SPU (73)
- TPP (61)
- Tutorials (42)
- SATC (41)
- Animated (17)
- Fb Timeline cover (15)
- Cluster Frames (9)
- alfadesire (9)
- Blinkies (7)
- Banners (6)
- FTU Tutorials (3)
- Desktop Background (2)
- Greeting Cards (2)
- Stamps (2)
- Wallpaper (2)
- Word Art (1)
Archives
- January (3)
- December (3)
- November (4)
- October (9)
- September (11)
- August (8)
- July (8)
- June (10)
- March (11)
- February (6)
- January (4)
- December (8)
- November (12)
- October (7)
- September (20)
- August (8)
- July (10)
- June (13)
- May (20)
- April (11)
- March (14)
- February (8)
- January (9)
- December (12)
- November (8)
- October (6)
- August (1)
- July (5)
- June (3)


0 comments:
Post a Comment